|

Custom Search
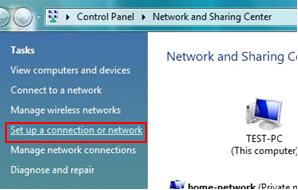
Wireless Adapter Configuration in VistaOk.. Let’s talk about wireless adapter configuration in Vista here! Configuring wireless adapter to join wireless network in Windows Vista is getting easier if you compare with Windows XP. Also Vista is capable to detect non-broadcasting wireless network (hidden SSID) and you can configure it as preferred network (this feature is not supported in XP). Let’s start to make it works… Wireless Adapter Driver Status and TCP/IP SettingInstall the wireless adapter driver correctly, if not it won’t work. You can always get the latest driver firmware from manufacturer website and install it. You can check this link on how to check wireless adapter driver status. After that, you need to configure the TCP/IP setting on the wireless adapter with IP address, subnet mask, gateway and DNS manually or from DHCP server. Take a look on configuring IP address and other network information here if you are not too sure how to do it. Note: If you have enabled DHCP setting on the wireless router, then you should select Obtain an IP address automatically and Obtain DNS server address automatically on your wireless adapter’s TCP/IP setting. WLAN AutoConfig Service in VistaWhich wireless utility you plan to use to detect wireless network and manage wireless network profile? You can use the wireless utility which is provided by wireless adapter manufacturer or the WLAN AutoConfig service from Vista. I like WLAN AutoConfig service, easy to use.. You can learn this easy way to start WLAN AutoConfig service here, which is part of Vista to detect wireless network and connect to it. This service is actually similar to Wireless Zero Configuration in Windows XP. Easy Way to Connect Wireless NetworkOk! We are now ready to connect to existing wireless network, you can use Vista’s Connect to feature to detect available wireless network, connect to it and then save the wireless network profile. Check this quick link on how to connect to wireless network, and then access Internet. Quite easy to do it. Please select network location type after connecting computer to network, this will automatically set the appropriate firewall and security settings on computer. Check out this network location type article to understand which location type you should choose and also how to change it later if needed. Creating the Wireless Network Profile ManuallyIf not, you can also create the wireless network profile manually and then connect to wireless network. This is useful especially the network that you plan to connect is not available now, but you know the connection settings. Here is the way to do it: 1) Go to Start and right click on Network and then click Properties. 2) Network and Sharing Center window will appear, click on Set up a connection or network.
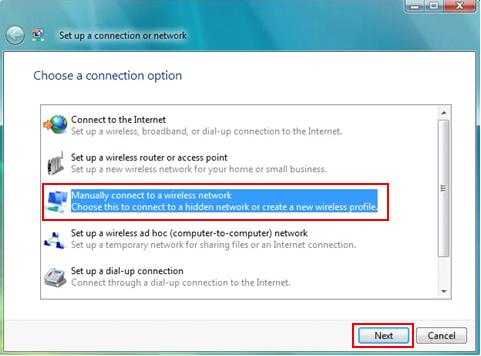
3) Set up a connection or network window will appear, click on Manually connect to a wireless network option and then click Next.
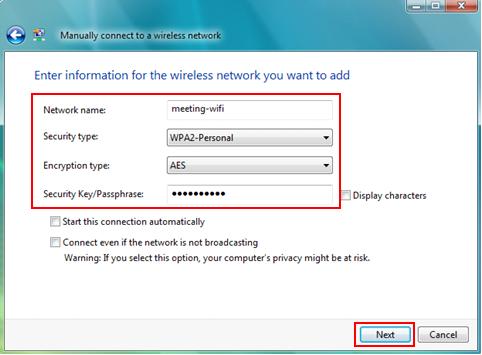
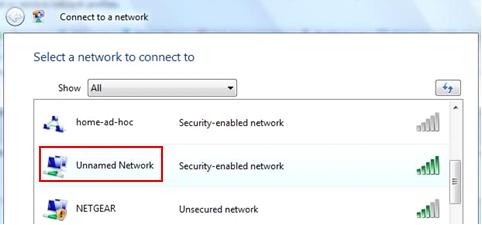
4) Here you need to enter the wireless network information (network name/SSID, security type, encryption type, security key) that you wish to connect. The supported security type are No authentication (Open), WEP, WPA2-Personal, WPA-Personal, WPA2-Enterprise, WPA-Enterprise and 802.1x. The supported encryption type are TKIP and AES. Click Next at last. Note: Tick on Start this connection automatically option if you want it to connect automatically next time when it’s in connecting range. Note: Don’t tick on Connect even if the network is not broadcasting option if possible for better security. The non-broadcasting wireless network will be show as Unnamed Network on Connect To window, you need to key in the network name (SSID) and security key in order to connect to it next time.
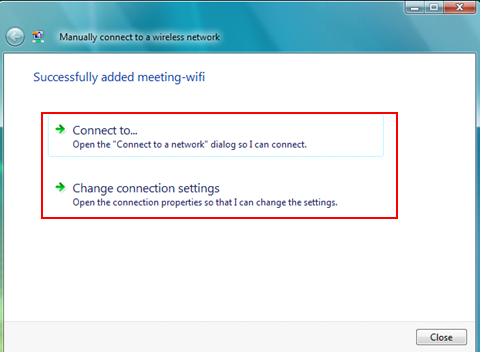
5) This final window will let you to connect to that created wireless network or change connection settings due to wrong settings. So, choose what you need to do..
Computer Name and WorkgroupOnce you have tested Internet website access, you can now assign computer name and workgroup to your computer, so that you can easily identify the computers in your network. Follow step-by-step instructions here to set computer name and workgroup. Furthermore, you can also do simple file sharing, password protested file sharing or printer sharing in the network. Test these features and see how you like it… Having problem? Check how to use ping to troubleshoot network problem. Looking for wireless adapter? Here are my preferred USB wireless adapter, wireless PCI adapter and wireless PCMCIA card. Have fun.. Next: Wireless Network Security
Return to top of "Wireless Adapter Configuration in Vista"!! |
Would you prefer to share this page with others by linking to it?