|
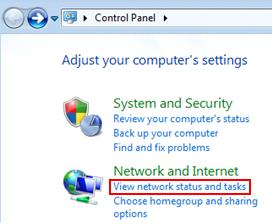
Windows 7 Wireless Adapter ConfigurationYou can take a look on this Windows 7 wireless adapter configuration article after you have set up your wireless router, so that you can connect Windows 7 computer to wireless network and access Internet websites. It’s pretty similar to how you configure wireless adapter in Windows Vista and the process is not difficult. Without wasting more time, let us start! Wireless Adapter Driver Status and TCP/IP SettingFirst you need to install the Windows 7 wireless adapter driver correctly and so it will operate well, if not you will face problem to connect to wireless network later. You can always check and download the latest driver from manufacturer website and install it if you have lost the installation CD, but sometimes it will be installed automatically by Windows 7. Take a look on how to check wireless adapter driver status article and ensure it works well. After that, you need to configure the TCP/IP setting on the wireless adapter with IP address, subnet mask, gateway and DNS manually or obtain those network settings from DHCP server. Take a look on configuring IP address and other network information here if you are not too sure how to do it. Note: If you have enabled DHCP setting on the wireless router, then you should select Obtain an IP address automatically and Obtain DNS server address automatically on your wireless adapter’s TCP/IP setting. Note: If you are using laptop with built-in wireless adapter, make sure you have activated the wireless adapter by turning on the wireless button, press Alt+F2 or other keys on the laptop. Read the laptop manual to know more. WLAN AutoConfig Service in Windows 7Now you need to decide which wireless utility to use to detect wireless network and manage wireless network profile. You can use the wireless utility which is provided by wireless adapter manufacturer or the WLAN AutoConfig service in Windows 7. I prefer to use WLAN AutoConfig service in Windows 7 as it’s pretty simple to use. If you prefer this WLAN AutoConfig service too, you need to set this service to start automatically whenever you boot up the computer. You can learn this easy way to start WLAN AutoConfig service here! Connecting to Wireless Network Easily and AutomaticallyOk! We are now ready to start Windows 7 wireless networking by connecting to wireless network, you can use network icon in Windows 7 to detect available wireless network, connect to it and then save the wireless network profile. Check this article on how to connect to wireless network, and then access Internet website. You can also set it to connect automatically next time. Please note that you will be prompted to select network location type when you first connects your computer to network, this will automatically set the appropriate firewall and security settings on computer. Check out this network location type article to understand which location type you should choose and also how to change it later if needed. Creating the Wireless Network Profile ManuallyIf not, you can also create the wireless network profile manually and then connect to wireless network later. This is useful especially the network that you plan to connect is not available now, but you know the connection settings. This is the way to create Windows 7 wireless network profile: 1) Go to Start and click on Control Panel. 2) Proceed to click View network status and tasks in Control Panel window.
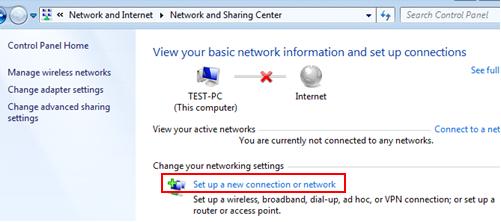
3) Network and Sharing Center window will appear, proceed to click Set up a new connection or network.
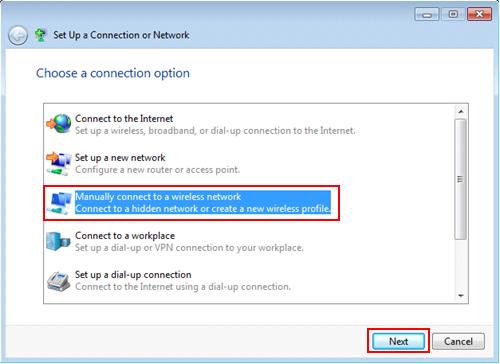
4) Set up a connection or network window will appear, select Manually connect to a wireless network and click Next.
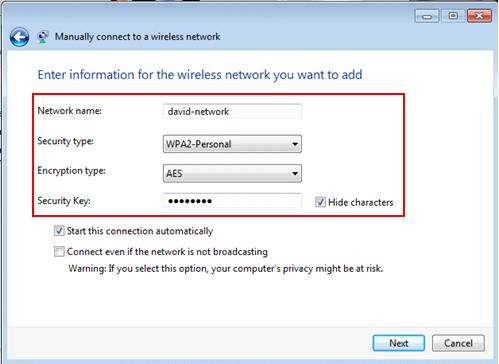
5) Here you need to enter the wireless network information (network name/SSID, security type, encryption type, security key) that you wish to connect (it should match the wireless settings on wireless router/access point that you plan to connect to). The supported security types are No authentication (Open), WEP, WPA2-Personal, WPA-Personal, WPA2-Enterprise, WPA-Enterprise and 802.1x. The supported encryption types are TKIP and AES. Here I key in the wireless network settings of my friend's wireless network, and click Next at last. Note: Tick on Start this connection automatically option if you want it to connect automatically next time when it’s in connecting range. Note: Don’t tick on Connect even if the network is not broadcasting option if possible for better security. The non-broadcasting wireless network will be show as Other Network on detected network list.
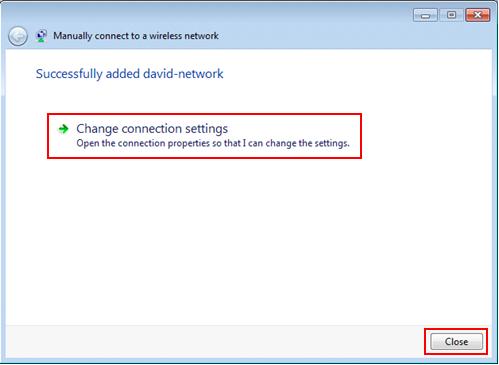
6) This final window tells you that your Windows 7 wireless network profile is created and you can change the connection settings by clicking on Change connection settings. Click Close at last. You computer will then connect to this new wireless network when it’s available.
Website Access and Computer Resource SharingYou can now assign the computer name and workgroup to your computer, so that you can easily identify the computers in your network. Follow step-by-step instructions here to set computer name and workgroup. In addition, also enable network discovery to discover other connected computers. Test to connect to Internet website, see how it goes. Thinking about sharing computer resource? Have a look on this simple file sharing or password protested file sharing articles to get it done. Test these features and see how you like it. Basically here you have done Windows 7 networking by using wireless adapter. Having problem? Check out on how to use ping to troubleshoot network problem. Looking for wireless adapter? Here are my preferred USB wireless adapter, wireless PCI adapter and wireless PCMCIA card. Hope you enjoy doing this Windows 7 wireless adapter configuration! It's not difficult! Next: Wireless Network Security
Return to top of "Windows 7 Wireless Adapter Configuration"!! |
Would you prefer to share this page with others by linking to it?