|
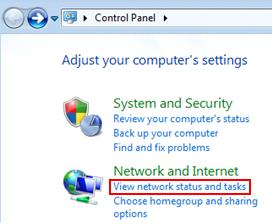
Quick Way to Configure IP Address and Other Network Information in Windows 7Let me show you how to configure IP address and other network information in Windows 7 here. As you know IP address must be configured on computer in order to communicate with other computers, because this IP address is the standard address understood by computers and other networking devices in networking world. You can configure IP address, subnet mask, gateway and DNS servers manually on computer, but you can also configure computer to obtain IP address and other network information from DHCP server (most of the time is configured on router). Without wasting any more time, let me show you quick way to do it: 1) Go to Start and click on Control Panel. 2) Proceed to click View network status and tasks in Control Panel window.
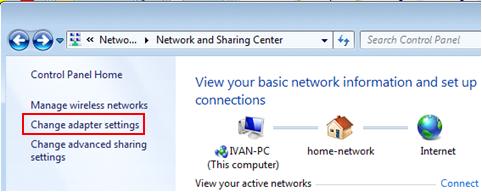
3) Network and Sharing Center window will appear, then click change adapter settings.
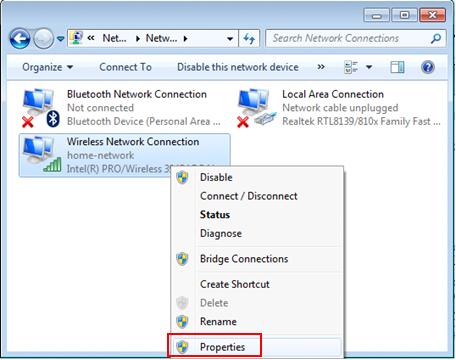
4) Network Connections window will appears. Here you can right click on the network adapter (can be wireless adapter or wired Ethernet adapter) that you wish to configure and click Properties.
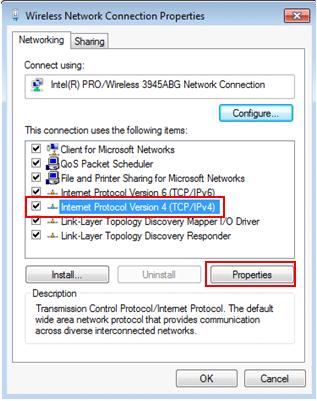
5) In the Network Connection Properties window, tick on Internet Protocol Version 4 (TCP/IPv4) and click Properties. Note: If your computer sits in IPv6 network, you can select Internet Protocol Version 6 (TCP/IPv6) to configure IPv6 address, but it’s not covered here.
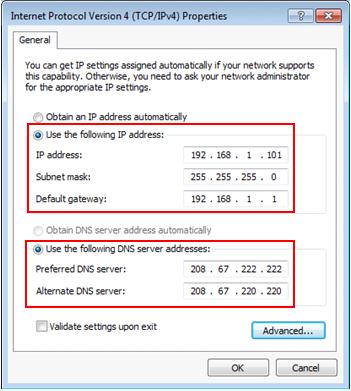
Manual IP AssigningIf you wanna do manual configuration, you can now key in the IP address, Subnet mask, Default gateway and DNS servers. Note: IP address of your computer must be unique. None of the 2 computers in the same network can share same IP address, because it will cause IP address conflict. Note: Default gateway is a router that can route the traffic to the other network or Internet. DNS server is an application server that can translate URL to IP address. Check with your ISP on what DNS servers you should use. If not, you can try this free Opendns or Google DNS servers.
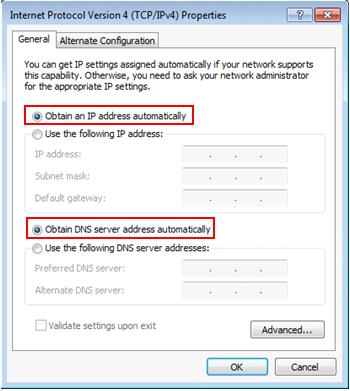
IP Assigned by DHCP serverIf you have DHCP server setup on your router or you have dedicated DHCP server, your computer can be assigned IP address and other network information automatically by selecting Obtain an IP address automatically and Obtain DNS server address automatically.
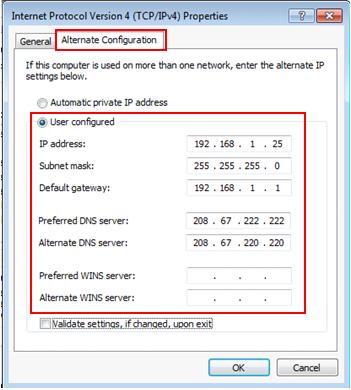
Note: If you have a notebook, and you use static IP at home and the IP assigned by DHCP server at the office, you can make use of alternate configuration to set IP and network information for these 2 different networks. Set Obtain an IP address and DNS automatically on General tab as according to what I specified above, so that the notebook will be assigned IP addresses automatically at the office. After that, click Alternate Configuration tab, select User configured option and key in your home network’s static IP and other network information. By setting this, when there is no IP information assigned due to no DHCP server at home, this alternate configuration will be applied automatically, so that you don’t have to spend time on configuring IP manually every time at home.
Return to top of "Quick Way to Configure IP Address and Other Network Information in Windows 7"!! Back to home-network-help.com |
