Windows 8 IP Address Configuration
Windows 8 IP address configuration made easy! In order for computer to communicate with other computer, laptop or other network devices, it needs to have IP address, subnet mask, gateway and DNS servers configured properly.How to configure all these network settings? Well! It can be configured manually or automatically with helps from DHCP server.
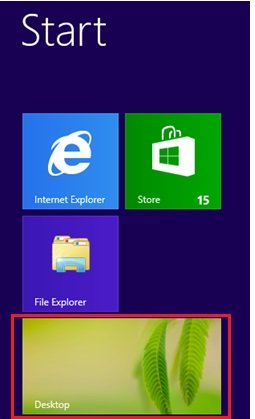
1) Click Desktop tile on Start screen in order to go to Windows desktop environment that you are familiar with.

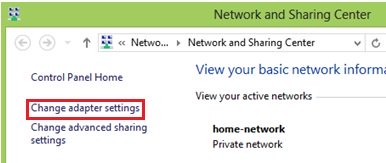
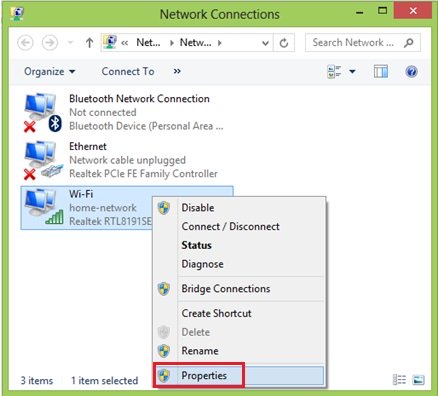
Note: If your computer is connected to IPv6 network, you can select Internet Protocol Version 6 (TCP/IPv6) to configure IPv6 address, but it’s not covered here.
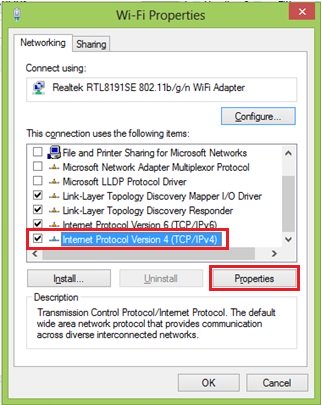
Manual IP Address Assignment
If you like to do manual network configuration, you can now key in the IP address, Subnet mask, Default gateway and DNS servers. Please bear in mind that IP address of your computer must be unique, because none of the 2 computers in the same network can share same IP address that will trigger IP address conflict problem.Note: Default gateway is a router that can route the traffic to the other network or Internet, usually it’s LAN IP address of your home router. DNS server is an application server that can translate URL to IP address, so that you could browse websites without problem. Check with your ISP on which DNS servers you should use. If not, you can try these free Opendns or Google DNS servers.
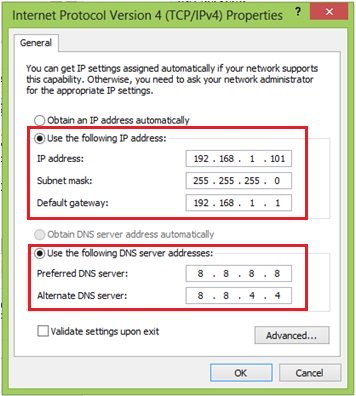
Automatic IP Address Assignment
If you have DHCP server configured on your router or you have dedicated DHCP server, you can configure your computer to get IP address and other network information automatically by selecting Obtain an IP address automatically and Obtain DNS server address automatically.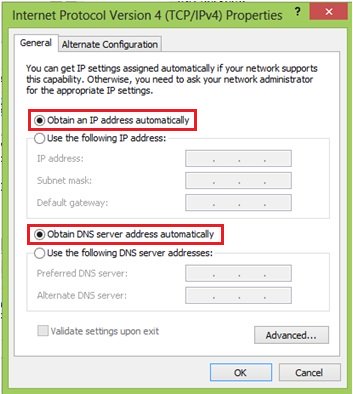
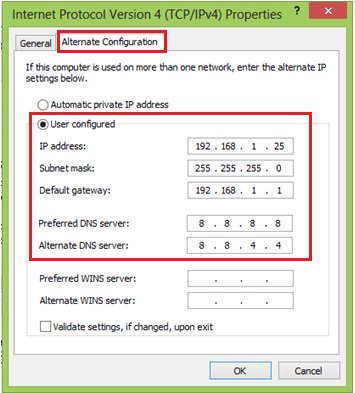
First, set Obtain an IP address and DNS automatically on General tab as according to what I specified above, so that the laptop will be assigned IP addresses automatically at the office. After that, click Alternate Configuration tab, select User configured option and key in your home network’s static IP and other network information. By setting this, when there is no IP information assigned due to no DHCP server at home, this alternate configuration will be applied automatically, so that you don’t have to spend time on configuring IP manually every time at home. That's it for Windows 8 IP address configuration.
How to Change Network Location Type in Windows 8
Real Time Protection with Windows Defender Antispyware
Using Wireless Print Server to Share Printers
Return to top of "Windows 8 IP Address Configuration"!!


Would you prefer to share this page with others by linking to it?