|
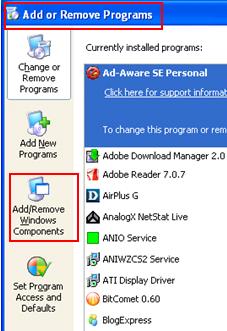
Enabling Free FTP Server in Windows XP ProfessionalIn case you are looking for free FTP server to do file transfer, then you can make use of ftp server that comes with Windows XP Professional. I need you to be aware of this, FTP server is good to do file transfer and copying, but the drawback is the communication traffic is sent without encryption, so the FTP login username and password will be seen if somebody sniffs the communication traffic. The better option is to use secure FTP with encryption feature. Here is step-by-step instruction to show you how to enable FTP server in XP Pro: 1) Go to Start and click Control Panel. Control Panel Window will appear, and then double click Add or Remove Programs. 2) Add or Remove Programs window will appear, then click Add/Remove Windows Components.
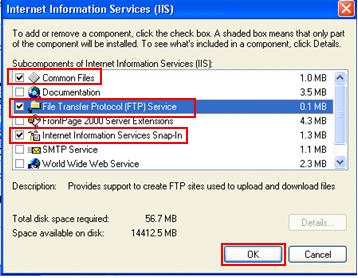
3) In the Windows Components Wizard window, scroll down and select Internet Information Services (IIS), after that click Details… button.
4) Internet Information Services window will appear. In order to run FTP server, you need to tick File Transfer Protocol (FTP) Service, Common Files and Internet Information Services Snap-In options. Click OK at last and you will be back to previous Windows Components Wizard window, click Next to continue and also you may be prompted to insert Windows XP installation CD.
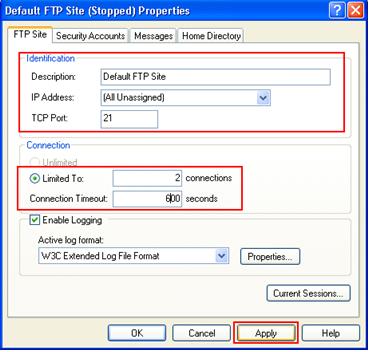
Configuring FTP Server5) Once you have installed this free FTP server, you need to properly configure it to minimize security risk. Go to your Control Panel -> Administrative Tools -> open Internet Information Services. Expand the HOME folder and then right click Default FTP Sites, click Stop to stop this service until you have configured it properly. Right click again and click on Properties.
6) Let’s go to FTP Site tab, here you can configure the FTP description, IP address and TCP port if you like, it’s optional and so I leave it unchanged. However here I limit to 2 concurrent connections and connection timeout is 600 seconds. You can just decide based on your scenario. Click Apply after that.
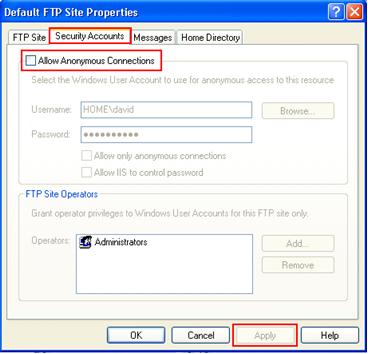
7) Proceed to click the Security Accounts tab, then un-tick Allow Anonymous Connections option, so that only the users on this computer can FTP to this computer by providing username and password. It would disable anonymous access and better secure you FTP server. Click Apply after that.
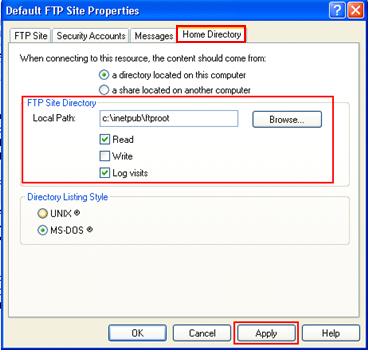
8) If you click on Home Directory tab, you will find out that the FTP home directory is C:inetpubtproot (of course you can change it), this is the place you can put the files that you let ftp users to download. Don’t tick on Write option unless you really want to give the write access to ftp users. Click Apply at last.
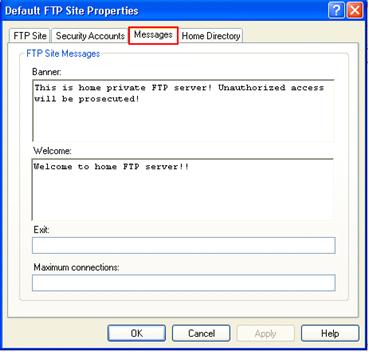
9) You can also key in your FTP server’s Banner, Welcome and Exit messages if you click on Messages tab.
10) After you have successful configured this free FTP server, don’t forget to start the FTP service. And now it’s ready to be connected by other FTP users. Note: If you enable Windows Firewall on this FTP server, you need to enable program exception on FTP port TCP-21. After doing several test, found out Windows Firewall does not support passive FTP well. I would recommend you to use FTP client with active FTP mode to connect to FTP server with Windows Firewall enabled. Other articles: Using FTP Client to Connect to FTP Server
Return to top of "Enabling Free FTP Server in Windows XP Professional"!! |