|

Custom Search
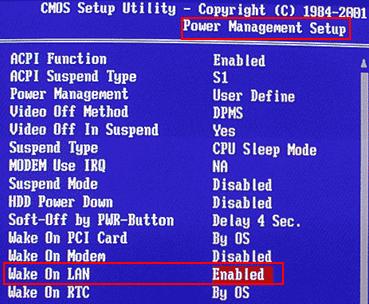
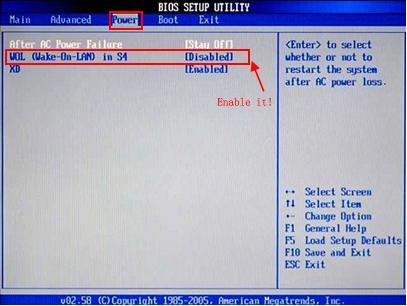
Wake on LAN: Quick Way to Power Up Computer RemotelyWake on Lan (WOL) is the implementation to power up your computer remotely from other computer within your home network or over the Internet by using special packet, called magic packet. On this article, I will show you how to power up your computer (remote computer) in your home network by using WOL implementation. Let say in your home network, you have computer A and computer B that are connected to network by using network cables. You wish to power up the computer B remotely (we call it remote computer in this case) from computer A, then here is how you can make it done. Remote Computer – Need to Enable Wake on LAN feature1) Let’s talk about WOL support on computer motherboard first, you can usually locate and enable it under Power Management section on motherboard’s BIOS setup page. If you fail to locate this setting and your computer is pretty new, then most probably this setting is supported by default. For my case, I’ve Lenovo 3000 N100 notebook but I couldn’t find this setting on BIOS, but it’s supported after finding the WOL setting on Ethernet network adapter’s device properties. Here are some WOL examples on motherboard’s BIOS settings: Note:Older motherboards must have a WAKEUP-LINK header on board and connect to the network card with a special 3-pin cable, but you don’t have to worry about this as you don’t need the additional cabling on modern motherboard and network card.
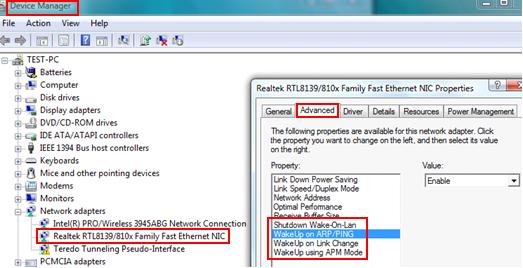
2) Ok.. Now let’s enable the WOL feature on computer’s Ethernet network card (the same computer that you wish to power it up remotely). You need to go to Device Manager and open the network card’s device properties, then you can enable all Wake on LAN related features. In my case, I disabled the Shutdown Wake-On-LAN and enabled WakeUp on ARP/PING, WakeUp on Link Change and WakeUp using APM Mode features on the network card’s device Properties under Advanced tab, then I can boot it up remotely. Click Apply and OK at last. Note: This WOL feature is only supported on Ethernet network card, you won’t be able to apply WOL feature on wireless adapter. Note: Ensure that this remote computer is power connected after shutting it down. If it’s not power connected, you won’t be able to boot it up remotely later. Also this computer must be connected to network with network cable. Note: The WOL feature would be named differently on different types of network card if it’s supported, but it’s not difficult for you to locate it.
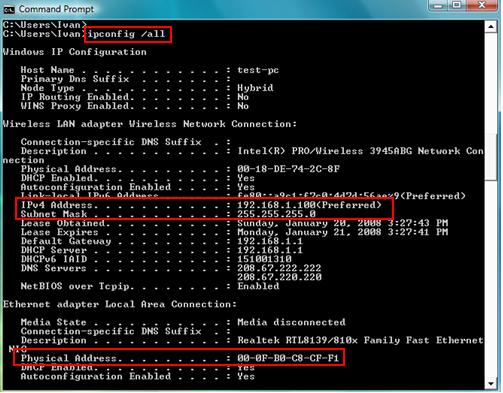
3) Ok..now go to open your command prompt (cmd.exe), and type ipconfig ⁄all, then copy down the IP address, netmask and MAC address (physical address) of this computer. After you have done these mentioned steps, you can turn off this remote computer. In my case, here is the network info: IP: 192.168.1.100
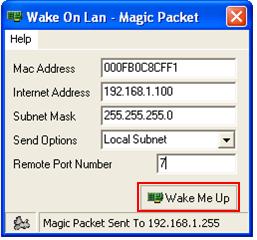
Other Computer – Need to have Wake on LAN Client1) You need to install WOL client on other computer in order to power up the WOL enabled remote computer. For me, I like to use this simple and free WOL application that’s developed by www.depicus.com. You don’t need to do software installation because this is an executable application. You can get this Wake On LAN client here. 2) After downloading the application, then just double-click on it, the following simple GUI will appear. Key in the remote computer’s IP address, netmask and MAC address. Select Local Subnet as Send Options and key in 7 as Remote Port Number. Finally click on Wake Me Up to power up your remote computer. Note: If you fail to power up remote computer by using port 7, then you can try on port 9 and 0 also. These 3 ports are common ports for doing WOL.
|
Would you prefer to share this page with others by linking to it?