|

Custom Search
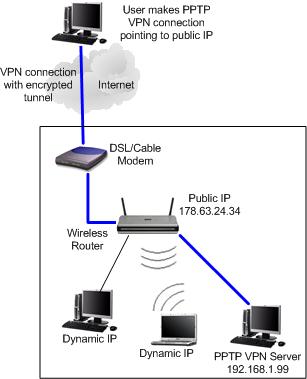
How to Set Up PPTP VPN Server in Windows 7This article will show you how to set up PPTP VPN server in Windows 7, you will then be able to connect to it securely and access your home network resources from Internet. Let’s take a look on the VPN network diagram below with typical home network setup, the Internet user can make a VPN connection over the Internet by connecting to home network’s DSL/Cable or other Internet public WAN IP (178.63.24.34 in this example), then connects to home PPTP VPN server (please assign fixed IP to this server, I use 192.168.1.99 in this example). Once the VPN connection is up, the communication between the user computer and this VPN server will be encrypted, so the hacker won’t be able to sniff the traffic. Ha! You can then access the shared files and other resources on your network.
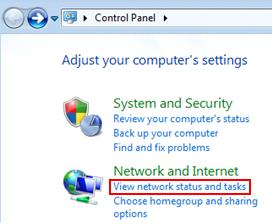
Without wasting more time, let’s start: 1) Go to Start and click on Control Panel. 2) Proceed to click View network status and tasks in Control Panel window.
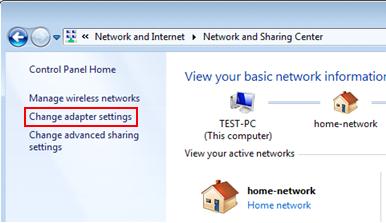
3) Network and Sharing Center window will appear, proceed to click on Change adapter settings.
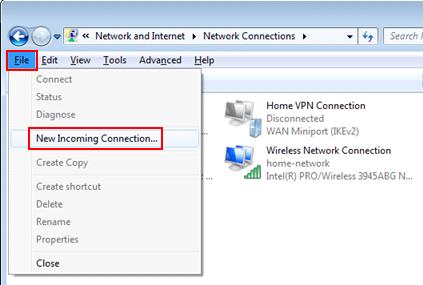
4) Network Connections window will appear, press Alt key on your keyboard in order to show File menu, click on File and then click on New Incoming connections...
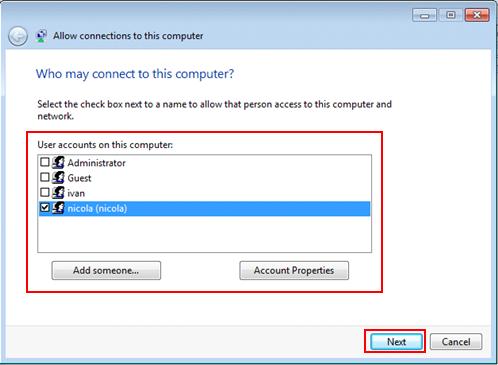
5) Allow connections to this computer window appears, here you need to select the user which can connect to this computer by using PPTP VPN (In this case, I select nicola), after that click Next. Note: You can click Add someone... button to create new user. You can also click on Account Properties button to check/reset the password of the selected user.
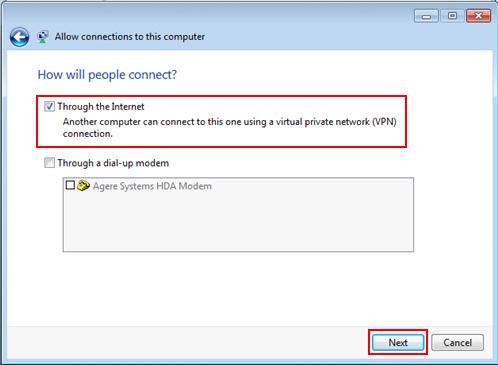
6) How will other people connects to your computer? Tick on Through the Internet (should be the most common selection) and click Next.
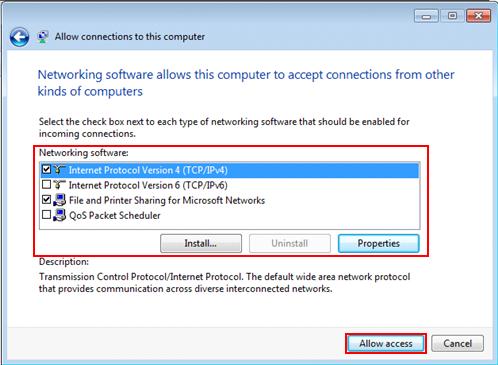
7) Ok! Here you need to select network settings for remote computer after connecting to your VPN network later. You must select Internet Protocol Version 4 (TCP/IPv4). You can select File and Printer Sharing for microsoft Networks if you want to allow this sharing. Click Allow access.
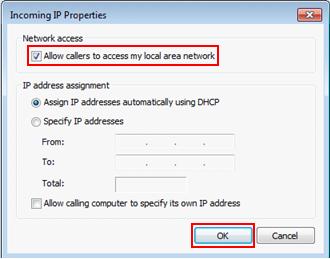
Note: If you click on Properties for Internet Protocol Version 4 (TCP/IPv4), you can see that it allows callers to access your local area network.
8) Click Finish to complete this VPN server setup process. 9) After that, you will see there is new Incoming Connections icon created in Network Connections window. You can still right click this icon and click on Properties to make changes on settings we have just configured.
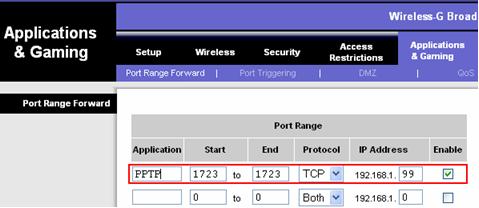
10) If you wish to connect to this VPN server from Internet by going through your home router, then you need to enable port forwarding and allow PPTP passthrough options on the router. Note: Since PPTP VPN uses port TCP-1723, you need to do port forwarding on TCP-1723. If you have problem to do port forwarding, then take a look on this port forwarding how to article. In this example, my VPN server IP is 192.168.1.99, so I do port forwarding to this computer’s port TCP-1723 on router.
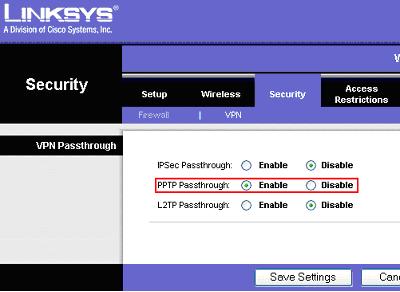
Note: Here is how I enabled PPTP Passthrough on Linksys router. Just go to your router management page to locate this option. Once you have done this! Yes! You can proceed to test to connect to this VPN connection!
Related Articles: Virtual Private Network (VPN) Introduction
Return to top of "How to Set Up PPTP VPN Server in Windows 7"!! |